
It doesn’t look like much, but this image represents success!
I have been through 5 days of frustration wading through tutorials for how to make a Tiger geocoder in PostGIS. My complaints, in a nutshell, are that every tutorial is either non-linear or assumes you already know what you’re doing… or both. If I knew what I was doing, I wouldn’t need a tutorial. And your notes on how you made it work are lovely, if only I could figure out what part of the process they pertain to. Enough griping. Here’s how I finally got this thing to work.
Note: I’m on Windows 10, PostGRESql 10, PostGIS 2.4.0 bundle. This tutorial draws from many existing tutorials including postgis.net and this one with additional help from Alex Mandel.
What is a Tiger Geocoder?
Let’s start by breaking this down. A geocoder is a tool composed of a set of reference data that you can use to estimate a geographic coordinate for any given address. Tiger, in this case, does not refer to a large endangered cat, but rather the US Census’ TIGER spatial files. This is the reference data we will use. The process we’re about to embark on should make assembling this data easy by using tools that will help us download the data and put it into a PostGIS database.
Install Software & Prep Folders
You will need to install:
- postgreSQL 10 – the database program that’s going to make all of this work
- The installer should walk you through installation options. Write down the port (keeping the default is fine) and password you choose. Pick a password you like to type because it comes up a lot.
- PostGIS 2.4.x bundle – PostGIS makes postgreSQL have spatial capabilities (much like a super power) and install the bundle option because it comes with things you’ll need, saving a few steps
- Make sure you’ve installed PostGRESql first
- The installer should walk you through the installation options.
- wget 1.19.1 (or a relatively recent version) – this is a tool that the geocoder scripts will need to download files from the census
- Save the .zip option to your computer.
- Unzip it in your C:/ drive so it’s easy to access later. Remember where you put it because you’ll need the path later.
- 7zip – this is an open source file unzipping tool that the scripts will use to unzip the files they download from the Census website.
You will need to create a folder on your computer to be your “staging folder”. This is where the scripts we’ll run later will save the files they need to download.
- Make a folder called “gisdata” in a place where you have write permissions and can find it later. For example: C:\gisdata
- Inside your gisdata folder, make another folder called “temp”. For example: C:\gisdata\temp
Make a Database
We need to make an empty database to put our files into.
Open PGAdmin 4. This is the graphical user interface for postgreSQL that should have installed with the postgreSQL files.
If PGAdmin 4 doesn’t start or gives an error, you may need to start the service that makes it run. In the Windows search bar, search “services”. In the Services window, right click postgresql-x64-10 and choose “start”.
In the browser panel on the left side of the pgAdmin 4 window, click the + to expand Servers and PostgreSQL 10. When it asks for your password, give it the password you wrote down during the installation process.
Right click on PostgreSQL 10 -> Create -> Database
In the Database name field, give it a name with lowercase letters. I named mine geocoder. Leave the owner drop-down on postgres. Click Save.
Expand the Databases entry in the Browser panel to see your new database in the list.
Enable Extensions
Right now, our database is just a regular database without spatial functions. We need to enable the PostGIS extension and the extensions that help us geocode.
Open the Query Tool: in the Tools menu at the top of the screen, select “Query Tool”. The top section of the query tool is where you type SQL commands. Underneath this is where the results of your queries are displayed.
Enable the PostGIS extension to give the database spatial capabilities by copying and pasting this code into the query tool and clicking the run button (it looks like a lightning bolt… why? I don’t know.):
CREATE EXTENSION postgis;
The next three lines enable extensions that help with the geocoding process (run them one at a time):
CREATE EXTENSION fuzzystrmatch;
CREATE EXTENSION postgis_tiger_geocoder;
CREATE EXTENSION address_standardizer;
Let’s make sure the extensions loaded correctly. This line of code should take the address (in between the parentheses and single quotes) and break it down into it’s components (create a “normalized address”):
SELECT na.address, na.streetname,na.streettypeabbrev, na.zip
	FROM normalize_address('1 Devonshire Place, Boston, MA 02109') AS na;
The output should look something like this:
 address | streetname | streettypeabbrev |  zip
---------+------------+------------------+-------
       1 | Devonshire | Pl               | 02109
Edit the loader tables
The scripts we’re going to run (in a few steps from now) will need some information to run correctly. The place they look for this information is a set of two tables that have been added to your database by the extensions we just enabled.
In the browser panel (on the left side of the window), expand your geocoder database, then the schemas list, the tiger list, and finally the Tables list. Make sure you’re looking at the tables list inside of the the tiger list… each schema gets to have it’s own list of tables.
Right click on the loader_platform table, and select “View/Edit Data”, and then “All Rows”. Now we can edit one of the entries to tell the scripts where to look for certain files and folders.
One row of the table has “windows” in the os (operating system) column. In that row, double click the cell in the declare_sect column to open up a window that will let you edit the text. For each line, you’ll need to make sure you type the path to the folder or file needed. This is what mine looks like after editing:
set TMPDIR=C:\gisdata\temp
set UNZIPTOOL="C:\Program Files\7-Zip\7z.exe"
set WGETTOOL="C:\wget-1.19.1-win64\wget.exe"
set PGBIN=C:\Program Files\PostgreSQL\10\bin\
set PGPORT=5432
set PGHOST=localhost
set PGUSER=postgres
set PGPASSWORD=Password123
set PGDATABASE=geocoder
set PSQL="C:\Program Files\PostgreSQL\10\bin\psql.exe"
set SHP2PGSQL="C:\Program Files\PostgreSQL\10\bin\shp2pgsql.exe"
cd C:\gisdata
(No, that’s not my actual password.) Note that some of the paths might be correct and others will not be, so check them all. When you’re done, click Save and then close the table with the x button in the upper right corner (side note: I find the pgAdmin 4 interface to be rather unintuitive). If it asks you to save your table, tell it yes.
Now open the loader_variables table. Change the staging_folder to your chosen staging folder. I hard-coded mine into the last table because it the scripts didn’t seem to be recognizing entries in this table, but change it anyway just to be sure. Again, save and exit.
Make & Run the Scripts
Add postgreSQL path to Windows
Before we can use postgreSQL in the command line (sorry to spring that on you… deep breaths… we’ll work through this together), we need to make sure Windows knows about postgreSQL.
For Windows 7, this Stack Overflow post should help. For Windows 8 and 10, try this one.
Make the Nation Scripts
Next, we are going to run a line of code that will automatically generate a script. We’ll run that script to automatically download data from the Census and place it into your database. (Yes, we are going to run code that makes bigger code that downloads data.)
Open a command line terminal (on Windows, search “cmd” in the search box and select the Command Prompt). Copy and paste this line of code into your terminal window, changing the path to your staging folder (but keep the file name at the end), then hit enter to run the code:
psql -U postgres -c "SELECT Loader_Generate_Nation_Script('windows')" -d geocoder -tA > C:/gisdata/nation_script_load.bat
(Quick note about what this code does… “-U postgres” tells the command that the user name for the database we want to work with is “postgres”. “-d geocoder” tells it that the name of the database to use is “geocoder”. “SELECT Loader_Generate_Nation_Script” is a function that postGIS can use to make the script we’re going to need. The ‘windows’ argument actually tells it to read the line in the loader_platform table we edited earlier.)
The terminal will probably return this line:
Password for user postgres:
Type in your password, although it won’t show anything on the screen as you type, and hit enter. A new prompt (the path for the folder you’re in and a >) will appear when it’s finished. Your staging folder should now have a files called nation_script_load.bat This new file is a batch file containing a series of commands for the computer to run that will download files from the Census’ website, unzip them, and add them to your database automatically.
Run the Nation Script
Running your new batch script in Windows, this is fairly straight forward (seriously, one step had to be, right?).
First, if you’re not already in the directory for your staging folder, change directories by running this command in the command line (How do you tell? The command prompt shows the directory you’re in):
cd C:/gisdata
Now your command prompt should say C:/gisdata >
To run the script, in the command line, type
nation_script_load.bat
and hit enter to run your .bat file. You will see a series of code run across your terminal window and it may open a 7zip dialog as it unzips files. This could take a little while.
When it’s done, you should have a tiger_data schema with tables called county_all and state_all. You can check to make sure the tables have data by running these lines in the pgAdmin 4 Query Tool:
Check the county_all Table:
SELECT count(*) FROM tiger_data.county_all;
Expected Results:
count
-------
 3233
(1 row)
Check the state_all table:
SELECT count(*) FROM tiger_data.state_all;
Expected Results:
 count
-------
 56
(1 row)
Make & Run the State Script
The process of making and running the state script are very similar to what we just did for the national script. This script makes the tables for a state (or multiple states) that you specify.
In the command line, run this code to generate the scripts for California:
psql -U postgres -c "SELECT Loader_Generate_Script(ARRAY['CA'], 'windows')" -d geocoder -tA > C:/gisdata/ca_script_load.bat
Note that if you want additional states, add them to the bracketed list separated by commas. For example, to download California and Nevada, you would run:
psql -U postgres -c "SELECT Loader_Generate_Script(ARRAY['CA', 'NV'], 'windows')" -d geocoder -tA > C:/gisdata/ca_nv_script_load.bat
Change directories back to your staging folder if needed by running this command in the command line:
cd C:/gisdata
Run the script by entering the name of the file into the command prompt:
ca_script_load.bat
The state script is going to take a while to load. It downloads many, many files. So go get a cup of coffee/tea/hot chocolate and a cookie while you wait.
Finally, we need to do some analyze all of the tiger data and update the stats for each table (reference). In the pgAdmin 4 query builder, run each of these lines separately:
SELECT install_missing_indexes();
vacuum analyze verbose tiger.addr;
vacuum analyze verbose tiger.edges;
vacuum analyze verbose tiger.faces;
vacuum analyze verbose tiger.featnames;
vacuum analyze verbose tiger.place;
vacuum analyze verbose tiger.cousub;
vacuum analyze verbose tiger.county;
vacuum analyze verbose tiger.state;
vacuum analyze verbose tiger.zip_lookup_base;
vacuum analyze verbose tiger.zip_state;
vacuum analyze verbose tiger.zip_state_loc;
Try it out
I know, it doesn’t seem like we’ve got a lot to show for all that work. If you look in the tables for your Tiger schemas, you might notice that there’s more of them, but let’s get some concrete results.
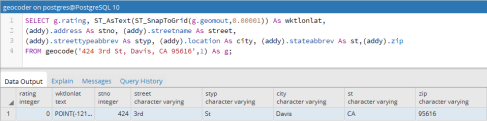
Run this code in the pgAdmin 4 Query Builder to return a coordinate for an address in WKT (well known text). Change the address to one in the state you’ve downloaded. (More testing option here.)
SELECT g.rating, ST_AsText(ST_SnapToGrid(g.geomout,0.00001)) As wktlonlat,
(addy).address As stno, (addy).streetname As street,
(addy).streettypeabbrev As styp, (addy).location As city, (addy).stateabbrev As st,(addy).zip
FROM geocode('424 3rd St, Davis, CA 95616',1) As g;
It should return:
rating |          wktlonlat          | stno | street | styp | city    | st   | zip
0      | 'POINT(-121.74334 38.5441)' | 424  | '3rd'  | 'St' | 'Davis' | 'CA' | '95616'
(That’s the address for the Davis, CA downtown post office, in case you were wondering.)
You Did It!
You did it! I sincerely hope that at this point you have a geocoder that’s ready to use. Next up, batch geocoding!

November 3rd, 2017 at 5:26 am
[…] https://experimentalcraft.wordpress.com/2017/11/01/how-to-make-a-postgis-tiger-geocoder-in-less-than… […]
February 8th, 2018 at 11:26 pm
What a great tutorial! Exactly what I needed!
Never again will I try to do something like this on windows instead of linux, but you certainly saved me!
February 9th, 2018 at 8:46 am
I’m so glad it helped! I’m not sure if the process is easier on Linux or not, but perhaps if you get one running on Linux, you can write up how it’s different.
July 7th, 2018 at 9:37 am
Fanastic stuff. Thank you.
September 25th, 2018 at 7:14 am
I tried using other walk through guides and failed this weekend, suffering from some of the frustrations that motivated you to write this guide. Having found your explanation, I tried again last night and withing 1.5 hours had my system up and running. THANKS!
This is a big step forward for our healthcare agency. Next bulk geo-coding and then a variety of analytical and mobile solutions become accessible.
September 25th, 2018 at 2:42 pm
I’m glad it helped! I use mine for healthcare data quite a bit at work. The TIGER data does ok. It’s not fantastic, but it’s better than nothing. I’ve been looking at Geocodio’s HIPAA service which we might purchase at my work. Their regular service is great for unrestricted data.
September 25th, 2018 at 7:55 pm
I hadn’t heard of Geocodio before, thanks. If you go with them, hopefully you’ll post about the experience.
Have you looked at OpenStreetMaps? Any experience with them?
As a non-profit we got a great deal on ArcGIS server/desktop software from ESRI but not on the StreetMaps data which they resell for about $15k/yr (similar to Geocodio’s annual subscription).
September 26th, 2018 at 9:08 am
Check out Pelias and Nominatum geocoders. They are trickier to set up but they use different (sometimes multiple) data sources. I haven’t set them up, but I was thinking about it for my last project where the TIGER geocoding results weren’t great.
January 8th, 2019 at 3:24 pm
Oh my god finally! A great tutorial 🙂 thank you
January 8th, 2019 at 3:29 pm
You’re welcome! I hope it helps!
September 18th, 2020 at 2:57 am
This was so helpful. Couldn’t have asked for a better step by step!!
December 24th, 2020 at 10:43 am
Phenomenal. So glad I ran accross this. My blood pressure had begun to increase.